Posted on Leave a comment

How to Get More Reviews for Your Online Business – The Legit Way

Nine out of ten buying decisions are influenced by online reviews.

That alone should convince you they’re important. But, if you need another statistic, half of your customers trust reviews more than the opinions of their own friends and family – especially when it comes to major purchases like cars, computers and travel accommodations.

Reviews are also crucial for local SEO, making up a tenth of your ranking factors. When people Google your company, many of the first-page results will be from review sites. So it’s crucial that there’s something on them.

However, as we’ve mentioned in a previous article, trying to buy them will almost always work against you. Various sites have started to come down on people who’ve been caught messing with their reviews, and you definitely don’t want to end up wasting your money on something that’ll just get you banned. Most fake reviewers are pretty inept at hiding it, anyway. We wish we had a dime for every Amazon review that sounds like it was written by a grinning telemarketer.

So, how do you get genuine reviews? Well, if you have a customer base established, you can…

Ask for Them. Maybe

It might not be a good idea to ask directly. Quite a few of your customers, especially the under-30s, won’t appreciate being pressured to say nice things about a service they may or may not have enjoyed.

Certain sites, like Yelp, don’t let you do it anyway. Which is fair. As they explain, owners will only ask their happy customers to leave a Yelp review, which will taint the review pool.

What you can do is provide a link to your Yelp page. In fact, as long as you don’t include an actual call to action saying “Leave us a review on Yelp,” you can be as blatant about it as you want. They even offer a page of badges just for that purpose.

Google+ still lets you ask for reviews, but be careful. They’ve been cracking down on solicitation recently, and the line between that and merely asking is often unclear.

If you’re going to, do it at the end of the transaction. For example, you can add links to your social media and all important review sites on your confirmation page, and include a reminder to check them out. You can also use a “give feedback” button to add more of a visual element to your call to action.

You can even offer incentives to customers likely to return. Although paying for reviews is illegal, giving customers discounts for them is not. WooCommerce even has an extension for this very purpose. And it doesn’t compromise the fairness of the review site, as they’re still genuine and not extracted via bribery.

If you do any business on the physical plane, print URLs for your review pages on flyers, receipts or business cards, although I suggest using TinyURL (or a related service) to shorten them first.

However, no matter what medium you use, make sure to ask your customers for honest reviews, not just good ones. As much as it may stroke your ego to fill your Yelp with raves, it won’t help you improve, and a total lack of dissent on a review page can make your viewers wonder if something fishy is going on.

Make it Easier

Both on yourself and on your customers.

First, you need to be on multiple sites. Most importantly, these:

  1.      Google+ Local
  2.      Yelp
  3.      Angie’s List
  4.      Yahoo Local
  5.      LinkedIn
  6.      TrustLink

The more sites you’re present on, the more exposure and options there are for customers to leave feedback. It also helps to have a review section on your website. But be careful, as there are multiple ways that can backfire.

Secondly, just as in sales or distributing information, autoresponders can be very helpful in getting you reviews. Just like with any type of messaging campaign, the content of your messages and how often you send them should be tailored, but generally, you want to send two or three at varying times from a few days to a few weeks after the purchase.

If you own a shipping-reliant business, the ideal time to send the first message is a little while after the customer has received the product – after he’s had time to open it and play with it, but before the novelty wears off.

ReviewManagement.com offers services to send your customers email queries and texts asking for reviews. It also hides bad reviews and sends positive reviews to review sites. This can border on the unethical, but it does get results. Certain services like Yotpo will allow customers to write reviews from their email inbox, eliminating steps like going to your site and logging in. That can increase the number of customers that leave reviews, too.

Improve Customer Service

People who had good experiences will be more likely to leave positive reviews.

Now, why aren’t we telling you to improve your product? Because that’s a separate issue, really. If you’re peddling crap, a paragraph in a blog post won’t change that. But altering your approach to customer service can make an already good business great. In order to tell you how to give good customer service, let’s start by defining the opposite.

What makes for bad customer service?

The common perception is that it boils down to rude reps. But that’s only the second most common cause. According to 72% of a Dimensional Research survey’s respondents, the worst annoyance is having to explain the same problem to multiple people. This suggests that one of the best ways to improve customer service is to improve communications between employees.

If your business has gotten big enough to have multiple customer service reps or multiple employees at a brick-and-mortar location, the biggest actionable step you can take is to instruct them to tell each other about problems. Don’t just go in the back, get the “guy who handles these things,” and shove him in front of the customer, then forget about it. Make sure they know much that extra bit of initiative will improve ratings, so they don’t just think you’re making up arbitrary rules.

Side Note on Handling Negative Reviews

Finally – and I can’t overstate the importance of this enough: if you get a bad review, don’t freak out.

Responding to bad reviews is a good idea, as it shows you care enough about your customers to address their concerns and take their advice. Unless the message in your response makes it look like you don’t.

So, in other words: no snippiness, no attitude, no accusing the customer of not having refined enough taste to appreciate what you do. Most importantly: no excuses. Those are the ultimate signs that you’d rather blame outside factors than focus on improving, and your customers will see right through it.

Conclusion

As nerve wracking as it can be, customer feedback is a tremendous asset to your company. The only people who have anything to fear from reviews are those engaging in the kind of business practices that don’t deserve good publicity in the first place.

So encourage them, the good and the bad, and both your sales and search rankings will thank you. Did I miss anything? Feel free to shoot me a comment below.

Images: Alan LevineKristina Hoeppner

Posted on Leave a comment

Setting Up Local SEO for Your Online Store

91% of American adults own a cell phone.

Of them, 63% are connected to the Internet. And of them, 46% use theirs to search for local products and services.

That, right there, is why local SEO is important.

Although it won’t get your site in front of as many eyeballs, local SEO makes up for it by fixing many of the global variety’s drawbacks.

The competition is nowhere near as fierce – it’s easier to land your widget store on the top page of search results when you’re only up against the other five in your hometown. And, the resulting traffic will be of more use to you – especially if you sell at a brick and mortar location as well as online.

And now that Google’s giving more real estate to local results, e-commerce is quickly beginning to see the benefits in thinking smaller. So if you want to bring in more traffic from your own backyard, these 5 steps will set you well on your way.

1. Take a NAP

…Or, more accurately, leave one.

No, not that kind of nap.

NAP stands for ‘Name, Address, and Phone Number’ – 3 things that should be on your website even if you don’t do any business in meatspace. So if they’re not, put them there now. This must be done in text, preferably on your main page or in a header or footer that shows up on all your pages.

While I’m on the subject of addresses, try to verify the consistency of yours across the web. Use the same spelling each time. For example, if your business is listed as being on ‘North Fort Place Drive’ on your website, don’t refer to it as ‘North Fort Place Dr’, ‘N. Ft. Place Dr’, or ‘N. Ft. Pl. Dr.’ anywhere else. Pick one and stick to it.

If you have more than one physical location in addition to your online store, create a dedicated ‘location’ page with all their NAPs, too. That will help them all place in the results instead of just the flagship one. And, if possible, your website’s page titles, URLs, image tags and copy should also include place names or local references.

This is a simple form of what’s known in the industry as ‘keyword placement’, which I’ll discuss in detail in the next step.

2. Research and Place Local Keywords

The place names are a bit obvious, but they’re just the tip of the iceberg when it comes to keyword placement. In order to know which other ones might help you draw in results, some keyword research is required.

This part can get tricky. First of all, you’re looking for the keywords that people search for when they’re actually looking to buy something, not just the ones they search for when they’re browsing. And you don’t just want popular keywords, but also ones that aren’t also being used by all your competitors. Thankfully, opting for local SEO can help out with both of those at once, but more research will still be required.

You can use a keyword research tool, like Google AdWords. Or, if you’re truly inexperienced with SEO and you have the budget for it, it’s a good idea to hire someone to handle this part. Once you have your list of locally relevant keywords, try to integrate them into your title, URLs, and copy – just like the place name.

It’s also a good idea to create a video about one or more of your keywords. Videos are fifty-three times more likely to get onto the first page of Google than regular HTML pages.

3. Register for Business Listings

Since I’m assuming your online business is already established, there’s a good chance you’re already on them. But since I also have to assume, for the purposes of this article, that you’re not (paradox tolerance is an important part of article writing), Google My BusinessBing Places, and Yahoo Local Listings are the best places to start.

Google My Business
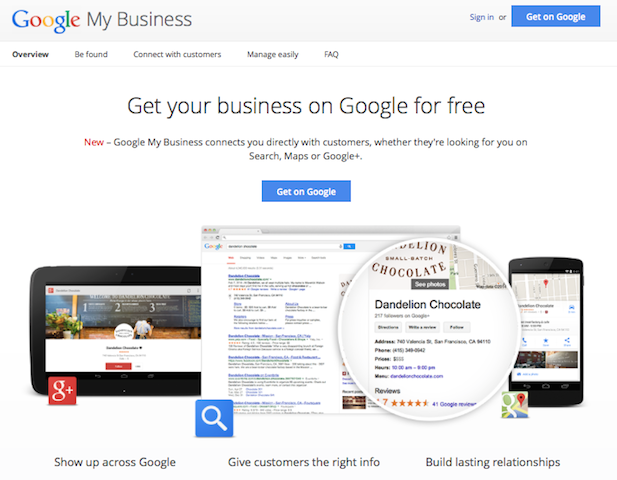
As a side note, if you’ve NAPed properly on your website, Google may have already found your information and made you a business page. The easiest way to find it is to go to click on the big, blue ‘Get on Google’ button in the center, then search for your business name.

These three sites will help your local SEO immensely, but you shouldn’t stop there. If you want to go above and beyond, it’s good to register with as many as possible.

Getting registered on local directories – like Yellow Pages and Yelp – is essential to getting more share in the local markets. You’ll not just get business from these sites, but also local links that’ll help increase search engine presence. A list of all the major ones can be found here, with many more available via Moz Local.

Social media is increasingly important. As with any kind of SEO, it helps to have a Facebook page – the only difference being that it’s even more important to connect it to your location. You should also have a sufficiently NAPed Google Plus page, too. Beyond that, additional social media presence is optional, but just like with review sites, more of it can only help your optimization efforts.

4. Publish Locally Relevant Content

Keywords are nice, but they’re useless if you don’t put them into something people actually want to read. If there’s no reason to click on your website, people won’t click on it. The best way to attract local audiences, is with good, locally relevant content.

What makes content locally relevant? If there was a definite answer to that, I wouldn’t be discussing it in such vague terms. But, there is some (vague) advice I can give you: try blogging about the local [insert your industry here] industry, funny facts your reader might not know about it and news about local industry developments. If you can find a way to make them interesting, that is.

Google Plus ReviewsIf you’re a community-focused business, it might also help to talk about general developments in the area you’re targeting – as long as you can keep it semi-relevant to your business and avoid partisan political issues.

Also, try searching for other people’s locally relevant content, sharing it, discussing it and reposting it. This will also have the benefit of increasing your local links and mentions on other websites and social accounts – which will really boost your presence.

5. Post Reviews

Having great reviews on your Google+ local page is one of the best publicity sources you can get, and it will give a nice boost to your SEO rankings. Ask your customers, both directly and through reminders on your site, to leave one.

There are plenty of places where you can buy fake reviews, but you won’t hear about them from me. It’s not a good idea, anyway. It can lose you customers, get you banned from review sites and generally give you a reputation for dishonesty. Plus, most fake reviews aren’t very convincing. You can often spot one a mile away.

It’s much better to get your reviews honestly, and work hard to make your business worthy of good ones. Since you’re an intelligent e-business owner, you’re probably doing that already, so… Keep up the good work! Next, become an active presence on review sites and respond to your customers’ reviews. That will encourage them to leave even more feedback.

Conclusion

Optimizing your local results won’t happen overnight, and I recommend you do more research as you continue with the process. However, following the advice laid out in this article should set you well on the path to improving your results.

Any other suggestions? Feel free to offer them up below.

Image source: Kate DollarhydeTakashi Hososhima

Posted on Leave a comment

Why Your Ecommerce Site Needs a Sitemap (And How to Generate One)

63% of ecommerce sites have a sitemap.

That might seem like a high percentage, but what bothers me is the 37% who are missing out.

Why? Because a sitemap is an integral component in your online store’s success. Thankfully, a missing sitemap is an easily remedied problem. Here’s everything you never knew you needed to know about sitemaps so you get familiar with the concept and implement one as soon as possible. 

What is a Sitemap?

In short, a list of all your webpages.

In not-so-short terms, a sitemap is a dedicated page that lists and links to all the other pages on your website, often providing metadata about each URL. There are two types of them:

  1. HTML, and
  2. XML.

The former are intended for human viewers, the latter for robots.

Why Do I Need One?

Back in the HTML-only days, the sitemap worked like a book’s table of contents. Viewers, confronted with one of those labyrinthine text-based ‘90s layouts, could just look at a list of links to find out what was where. But we’ve moved on since then; these days, most sitemaps are aimed at search engines.

For those of you new to SEO, search engines use programs – commonly referred to as “robots,” “crawlers,” or “spiders” – to hunt down new pages to index, usually finding them through links from other pages. There are a lot they can’t get to, however, mainly pages that are only accessible by anything but an HTML link, like pages connected to videos, Flash content, or forms.

That’s where sitemaps come in. They don’t improve your search engine rankings on their own, but they’re a great way to let the robots know what to rank in the first place.

In addition, XML sitemaps provide all kinds of helpful information for the crawlers. Using metadata, you can tell them which pages are more important than others, how frequently certain ones are updated, and each one’s relative importance. These bits of information will let the robots know how frequently to crawl your site. And if that’s not enough, you can just set the crawl rate yourself via a simple tag.

HTML sitemaps can still provide an alternative to more design-centric navigation structures that often place form over function. A good sitemap will ensure your visitors know where to find everything.

It’s worth noting that very few people will see it, though. According to Lunametrics, only a quarter of a percent of visitors to any given site ever look at its map. But that’s a good thing. Too much traffic to a sitemap often means the rest of your website’s navigation needs to be improved so people can intuitively find the page they need instead of having to look it up. In other words, sitemaps help you out whether people see them or not.

If you haven’t established your site yet, now’s the perfect time to start planning. Ideally, you and your web designer should prepare all the links and metadata you’ll need for a comprehensive map before even launching the site.

New websites and blogs that will see the most benefit from having a map.  Most new blogs, especially, don’t usually get many backlinks to their individual posts, so it becomes harder for search engines to discover their content. And sites without maps can often go months before Google even discovers them, let alone places them in its rankings.

Sitemap Setup

There are a variety of ways to set up a sitemap, some easier than others.

Certain website builders – like GoDaddy and Wix – automatically create them.

In WordPress, all you have to do is install a plugin. There are two especially popular ones: WordPress SEO by Yoast and Google XML Sitemaps. The latter has been downloaded ten million times, effectively making it the standard.

In Yoast, all you have to do is install and activate it, then in the SEO menu in the left sidebar, click XML Sitemaps. Check the box labelled Check this box to enable XML sitemap functionality and save your settings. Most WordPress sitemap plugins are similarly simple.

Google XML SItemaps

Google XML Sitemaps, however, offers more control over your map’s content. Most notably, it allows you to add pages that were not created with your WordPress website. It also allows you to include or exclude various pages and parts of your site, as well as offering all kinds of bells and whistles like the ability to sort blog posts by comments.

There are plenty of third-party generators as well. XML-Sitemaps.com will generate a free XML sitemap, as per the title, for websites containing up to 500 pages. The results can be downloaded, then uploaded into the domain root folder for your site. However, in addition to the page limit, it also sets the update frequency as the same for every page. Obviously, you probably won’t be changing the content on every page on your site at the same time, so if you want your search results to stay up-to-date, then this might not be the way to go.

There’s also Likno, which has limited functionality, but will generate a decent barebones map to work with.

Finally, if you have an organized list or your pages and some basic HTML and XML skills, you can make your own. There are no advanced design or coding skills needed, just the ability to create text links and insert the appropriate meta content.

Sitemap Generation Tips

Present all links in text and link to your map via the homepage. A lot of sites place it in the footer so as not to interfere with the rest of the site’s navigation. Don’t give it an overcomplicated or cute name. Industry standard dictates you just call it the sitemap. And keep in mind that it should function as a supplement to, not a substitute for, your main navigation.

Choose an organization style.  Most designers arrange them either by category or just alphabetically. But no matter what style you choose, the important thing is to make sure the results are clear and intuitive.

Try to confine links to one screen. An overly long list requiring too much scrolling might overwhelm the viewer. Beyond that, it can conform to the rest of your website’s design scheme. Finally, one of the downsides of making your own map is that it’s up to you to keep it current. If you let it fall behind your website’s actual content, it effectively becomes useless.

Make two sitemaps. If your SEO-targeted sitemap seems a little cold and unfriendly, consider creating an HTML one to go along with your XML document. You can even create multiple HTML sitemaps in different styles, targeted to different audiences… but that’s out of the scope of this article.

Submit it. Finally, after creating a sitemap via any method, you should submit it to Google and Bing via their respective Webmaster Tools pages. Granted, they’ll probably find it on their own eventually, but if you submit it yourself, you get the benefit of analytics. For example, Google’s Webmaster Tools offers a detailed breakdown of how many pages and images have been indexed.

As a final note, a quick trick to give the crawlers easier access to your sitemap is to stick a line like this in your robots.txt file:

Sitemaps:http://www.[your domain].com/[sitemaps page name].xml.

To make a custom robots.txt, you can either type one up in Notepad and upload it to your website, or if you’re a WordPress user, you can edit it via a plugin like WP Robots Txt.

Conclusion

With all the benefits of having a sitemap, the variety of options for creating one, and the many ways you can get one for free, there’s no reason not to have one. Or two. Your search engine placement and sales can only benefit from it.

Questions? Comments? Any sitemap-based SEO success stories you want to share? Leave us a comment below!

Image source: INPIVIC Family

Posted on Leave a comment

Is There Demand for Your Product?

So, you’ve got a great product or service that you’d like to launch online. But you’re hesitant.

Why? You’re hung up on the potential of whether there is enough demand or too much competition in your niche.

And rightfully so.

The last thing you want to do is invest your blood, sweat and tears into a business idea, only to find out it’s a dud later down the road. Before you jump into anything, it’s critical that you assess both the supply and demand for the niche that you are selling into first. You want to get a sense of the potential market – or lack thereof – for your idea before pouring all your time, effort and money on it.

Here are some ways to assess the strength of your business idea before you get started.

Keyword Evaluation

Google Keyword ToolChecking to see how many searches per month that a particular product gets is a great starting point to see if your niche is big enough for you to make a decent living.

For example, analyzing keywords should allow you to quickly determine what your profit per sale could approximately be by weighing the competition’s prices versus your wholesale cost. Then you can make a rough estimate of what your click-through and conversion rates would be, giving you an idea of what your range of profit numbers might look like.

Using the Google Keyword Planner Tool will give you the opportunity to search for keywords to identify the number of searches that are being made every month for a particular term, what the competition is like, and any related keywords that are being used to search for a specific product.

Ideally what you want to see are search terms related for your product that get high search volumes, but without super high competition. While more broad terms related to your product might have high competition, there may be plenty of related search terms that have low to medium competition with high search volumes, which translates into a potential opportunity.

While a lot more needs to go into identifying whether your business idea may be profitable, conducting a keyword analysis can allow you to filter through poor ideas with very little demand right away.

Google Trends

Using Google Trends is a great tool to see if the product you’re thinking of selling is on an upward trend in popularity, and when it all started.

Google Trends
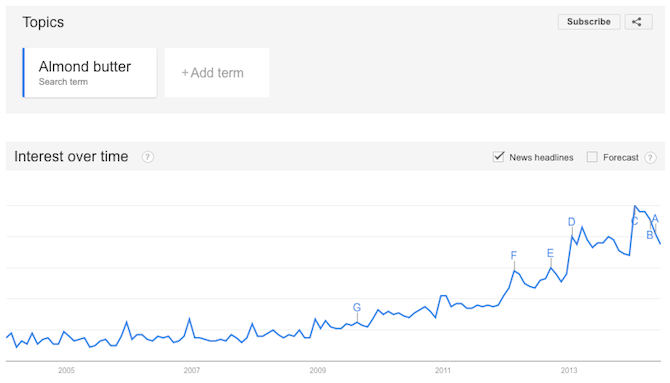
For example, if you’re considering getting into the market of organic almond butter, a simple scan through Google Trends will show you not only if popularity exists for this product, but also what the current trend is. If you see a rise in trends for the product, you may have something solid to go on.

To validate the popularity for the product, scan through recent product reviews. Ideally, the majority of reviews should favor the product. However, if you do see any negative comments, reading through them can also be helpful in discovering deficiencies in current products that you might be able to take advantage of.

Content Competition – What is Ranking in Google

It’s helpful to conduct a Google search using a broad search term for your product to see what is currently ranking in the top few spots. This will help you get an idea of what your competition is like.

Ideally, what you’d like to see taking top spots in Google are random posts and articles that aren’t necessarily tied to any company or strong domain that is taking over the search term. You want to see the same sort of thing when using related search terms as well. With this type of scenario, you have a pretty good chance of ranking pretty high in Google when you’re competing for the term. This would be a lot tougher if you were up against major brands and companies, of course.

Your Geographical Area for Business

Now that you have determined that plenty of people are in fact searching for your product, you want to identify where these people are located. This is particularly important if the product you plan on selling is specific to one geographic area. You’ve got to ensure that the people who are searching online for your product live in the area that you can sell and ship to.

Luckily, there is a quick and easy way to do this – by using Google Trends. By simply plugging in your search terms, Google Trends will populate the countries and cities where people are searching for your product, as well as how many searches are being conducted in each geographical area.

Forums

Online forums are particularly useful for getting an idea of what people are looking for. Visit a few forums in your niche and conduct a search for your main terms and related terms to see if people are asking questions about your product. When you visit forums within your niche, are people talking about your product, and are they looking for it? Landing on a kind of product a lot of people are talking about but doesn’t have wide availability is ideal.

Social Media Popularity

Browsing through social media channels like Twitter, Pinterest, and Facebook can help you get an understanding of the market for your product and its demand. You can use Twitter to check out the volume of daily tweets by searching your keywords. For example, if your product involves organic almond butter used for skin care, conducting a search using the terms “organic”, “almond butter” and “skin” will give you sense of the sentiment of the tweets out there, and if there is selling potential.

If you come across a number of phrases like “I’m looking for,” “I need,” and “Where can I find…?” along with your product search terms, you might have the potential for a solid business opportunity. Using social media platforms to research your product will give you an idea of the weight of conversation around your idea, as well as the type of language potential customers are using. This can be extremely helpful when writing product descriptions when you finally decide to launch, too.

Evaluating the Competition

Although the quantity of competition for the product is important to consider, what’s even more important is the quality of the competition. If you have a unique spin on a particular product, you just might have the edge necessary to be very profitable in your niche.

If you find that you might get lost in the crowd, you might want to consider narrowing your niche, then specializing in it. With a more generic product, you could find yourself up against already-established big-wigs in the industry. By narrowing your focus, you could find yourself ranking much higher in search engines since your product is so targeted. Using our almond butter example, rather than trying to sell plain almond butter, consider adding “organic” or “all-natural” in the mix or another flavoring. Or, you get the idea.

Once you’ve set your sights on your niche of choice, identify who your top competitors are, then do a search of all their backlinks. This essentially allows you to determine what it will take to rank on the top spot of Google for your product. Since the number of quality backlinks can be a huge determinant of how well your website will rank, you can assess how much work it will take to overtake your competition.

Conclusion

It’s key to understand that opening up an online store is not like opening up a traditional physical store.

In many ways, it takes more work and time to analyze your potential for profitability than it actually takes to open a brick and mortar location. If you find your product fits all the criteria mentioned above, you just might have a winner on your hands. Of course, there are a number of different avenues you can take to find out if your product can be marketed and sold to allow your online store to soar. And that’s where you come in.

Are there any ideas you know of that can help in the assessment of potentially profitable products? I’d love to hear all about them below!

Posted on Leave a comment

Case Study: O V E R Clothing

With close to 2,000 entries in our Golden Ticket competition, it wasn’t easy picking a winner. So many of the sites we reviewed blew us away and we were left greatly impressed with our community and how they’re using WooCommerce. If Golden Tickets grew on trees, we’d be handing one to each of you!

We narrowed the pool of 1,965 entries down to a short list of thirty two, took a vote and agreed that Sinisa from O V E R Clothing deserved the mighty Golden Ticket. World, meet our winner.

Much like all of us, Sinisa’s web development career started years ago. Over time he slowly learnt more and more online, never doing any courses or formally studying it but just by practicing. Everything Sinisa learnt was self-taught online through hard-work and the many tutorials available.

Having worked with WordPress for over five years now, Sinisa is quite the advanced user. He started off using WordPress in client jobs, eventually moving into theme design and development.

In the past couple years O V E R has been his main focus, with Sinisa leading the reigns on the development of the site along with his partners, Marco and Zeljko, who take care of the illustration and design. It’s been a project that has taken almost 10 years of effort to reach the point it’s at today.

The story began in 2005, through a small scope of people who would preorder the then unbranded tee’s as they circled over email. As a small group of friends wore the tee’s, desire from a larger crowd came, which became a deciding factor for the project going public in 2012.

“Emerging from personal demand and the basic desire of having something different and unique, design remains the driving force behind O V E R, which is run by a small group of local creatives from different fields, united with passion for the things they make.”

O V E R Clothing took a lot of unique customisation and coding to get to where it is today. One of the biggest hurdles facing Sinisa was being able to handle both Serbian (O V E R’s home) and international customers.

With a lack of payment gateways in Serbia that would charge in the Serbian Dinar (as legally required), Sinisa had to come up with a way to charge the Serbian customers with Cash on Delivery but international customers with credit cards, using the 2Checkout gateway.

Eventually he decided to use a Geolocation by IP WordPress plugin, that allowed him to determine where users are based by looking up their IP. This way, international customers would see a site with $USD while Serbian customers would see prices in the Serbian Dinar. The same GeoIP Plugin helps show a different payment gateway to users too.

Sinisa also found a need for the Table Rate Shipping extension, which allowed them to charge different rates to customers in different countries, making international sales far easier.

Another WordPress plugin that O V E R Clothing utilised was WordPress SEO Plugin, a favourite among all WordPress users.

One of the more impressive aspects of the site is the credit feature that Sinisa built. Basically, users can earn unlimited credit on the O V E R Clothing store by referring friends. His custom-built credit system takes care of friends referred, their website visits, their spend and even how often they checkout.

Sinisa is pretty excited about his upcoming trip to San Francisco. For him, it provides an unprecedented opportunity to meet other like-minded developers and improve his knowledge of WooCommerce and WordPress. Having never been to America before, it’s also a great opportunity to fit in a little bit of San Francisco touring.

He’s yet to have the chance to visit a WordCamp, but is hoping to help organise one soon that would also allow WordPress users in neighbouring Macedonia and Croatia to join. Fortunately in September, Sofia, Bulgaria will be playing host to a #WCEU that will go a long way in satisfying many European WordPress users. If you’re around for that, be sure to look out for our Golden Ticket winner!

Sinisa is really looking forward to meeting the WooThemes team, especially the developers behind WooCommerce and the Woo founders. Given the chance he would also love to meet Matt Mullenweg (who wouldn’t!). To end, the tough questions:

iPhone or Android? iPhone
Mac or PC? Mac (anything Apple)
Favourite TV Show? Breaking Bad & House of Cards
Favourite Movie? Shawshank Redemption.

A big thanks again to everyone who entered our Golden Ticket competition! If you missed it, check out the short list. We were so impressed by the talent in our community it made the competition somewhat of a heart wrenching experience, akin to picking favourite children. Suffice to say, thank you for allowing WooCommerce to be a part of your life and your world. We’ll be following up with many of the entrants to do case studies, hear more and connect.

We’ll be posting highlights from Sinisa’s trip to San Francisco with us in November, but for now, be sure to check out O V E R Clothing and the incredible work that Sinisa has done on it. And as WooConf ticket sales are officially open, buy a ticket and join us!

Posted on Leave a comment

Create a custom Canvas homepage using SiteOrigin Page Builder

Many of our themes include a “Business” or custom homepage template that allows you to create a traditionally laid out landing page giving visitors and overview of your business. This is a good starting point however sometimes you might want some more flexibility to create truly unique layouts.

Enter SiteOrigins Page Builder

SiteOrigin’s Page Builder is a fantastic plugin which allows you to create complex page layouts and pull in content via widgets. It’s well worth watching the video on their plugin listing page to get an idea of the functionality this plugin provides.

In this article we’re going to explore using this plugin (along with some of our own) and Canvas (although you can use any theme) to create a custom homepage displaying features, testimonials, products, projects and some recent posts.

Install the plugins

We’ll be utilising features of the following plugins so step 1 is to install them:

Only the Page Builder is necessary, but we’ll be using the others to add different elements to the page. For brevity I’m going to assume that if you’re using these plugins then you’ve already added some content to them (products etc).

Create the page and display some products

For the first section on this page we’re going to display a featured ‘hero’ product and the 4 most recent products alongside it.

Step one is to create the page itself and set it to use the full width layout.

Create the page, switch to the Page Builder tab and select to full width layout option

To add the products we’ll be using WooCommerce shortcodes and text widgets placed in regions created by the page builder.

Add a widget row

Click the add row button and choose 2 columns to create a row containing 2 equal width columns. These columns are where widgets can be placed. The Page Builder will give you a basic visual representation of how this will look on the frontend.

Create a widget row of two equal columns

Next, click Add Widget, search for “text” and click it to open the text widget dialog box. Leave the title blank and in the content box add the WooCommerce shortcode:

Click “Done” to add the widget.

Add a text widget containing the featured products shortcode

Next, add another text widget and use the shortcode:

This will add a second widget to the first of the 2 columns we created in our row. Simply drag the second widget into the second column to arrange the products.

Add another widget then drag and drop to arrange the layout

Save the page and then preview it. You should see something like this:

Look at that spiffy product layout!

At this stage you might want to play with the number of products displayed and/or the column widths to get the layout just right. To line everything up nicely I’ve tweaked the first column to be 55% wide, making the second 45% by dragging the column separator in the page builder. This is the result:

Perfect alignment, phew!

Testimonials

Now that we’ve got some products up on our homepage, let’s display a customer testimonial so that everyone knows how great our customer service is!

Lets add another row, this time with just a single column. Afterwards click Add Widget again and search for “Testimonials”. Click the testimonials widget and configure it to display a single testimonial, picking a specific post ID if that’s your preference.

Add the testimonials widget

Click “Done” to add the widget. Again, this will be added to column 1 of row 1, so just drag it down to the new row we just created then save the page.

The testimonial will now appear beneath your products and look something like this:

This is how the testimonial will display on the frontend

Display Features

Beneath the testimonial we’ll display some features. Create another row with 1 column, click Add Widget and search for “Features” and click it. We’re going to display a row of 4 features by specifying the widget options like so:

Add the features widget

This will produce a row of 4 features beneath the testimonial and look something like this:

Features on the frontend

(Please note that in this demonstration I’m using the Icons for Features plugin to display icons for the features).

Display Projects and Posts

Finally, let’s display some projects and some recent posts. Add another row, this time with 2 columns. Click Add Widget and add another text widget. We’ll use this text widget to display projects by adding the shortcode

[projects limit="2" columns="2"]

Click done then drag the widget to the appropriate column.

Click Add Widget again and search for “Post Loop”. This widget is included in Page Builder and as the name suggests will allow you to display a loop of recent posts. There are several options in this widget, for now we’ll just display the most recent post using the loop.php template file.

Add the PageBuilder Post Loop widget

Drag and drop the widgets accordingly as you did with the products earlier.

Putting it all together

All together your page should now look something like this:

The finished article!

Hopefully this demonstration gives you an idea of what’s possible by simply using the Page Builder plugin, some shortcodes and widgets. This is of course a fairly basic example. By adding a little custom css, tweaking the layout, introducing a slider, adding more columns etc you can create a truly unique page layout with a variety of content, right from the dashboard. The possibilities are endless!

Posted on Leave a comment

So You Want to Be a Dropshipper: Picking the Perfect Product

Tell me if this sounds familiar: you want to be a dropshipper, but you haven’t quite put your finger on the exact niche or products to focus on.

Not surprising, as this is often the biggest challenge that dropshipping hopefuls face before their online biz takes off.

You’ll often hear people diving into a business idea based solely on their passion. While this might a good starting point from which you can further hone in on a specific product, you shouldn’t stop there. Ensuring that you attain success in your business will require that the product you pick is actually a profitable one – not just something you have a good deal of interest in.

If your primary objective is to develop a profitable dropshipping website, you’ll have to make a conscious effort to set your personal interests aside and do the necessary market research.

Picking the Right Product

Obviously, choosing the perfect product that you’ll market and sell is at the crux of your business, so make sure you set your sights on the right one.

The Right Price Point for the Service. You absolutely must think about the price tag in relation to the kind of pre-sales service you have to offer. For instance, if you’re planning on selling a high-ticket item, you’ll have to be able to afford a high level of service, including direct phone contact. Someone forking over $2,000 for a product will no doubt want to be able to chat with a sales rep first before opening their wallet. Make sure the margins are deep enough to justify the amount of support you’ll have to provide.

Marketing Potential. Don’t wait until after you’ve launched your product before you consider marketing it. That can be a total nightmare. Instead, start thinking about your marketing plan well in advance of the product’s launch and brainstorm some ideas to promote your online shop.

Not Easily Found in the Local Market. You can capitalize on a product that isn’t readily available in your local market, as long as you aren’t too razor focused. Anything that can’t be found at the local store will probably be searched for online, and your e-commerce store will be ready and waiting.

Low Turnover Rate. Try to focus on products that don’t have to be updated every year. This will help your capital last longer. In contrast, if the product changes annually, so will your website, which will just cost you a ton more time and money.

Snag the Ideal Customer

Zeroing in on the right demographic for your product can mean big business for you. Attracting the kind of clients that have no problem spending while being very courteous can really pay off. Focus on these types of clients for your dropshipping company:

Businesses. Business clients just about always buy in large volumes, which can translate into a hefty influx of cash for your company. Not only that, but by establishing a relationship with your business clients, you’re are likely to get your foot in the door and turn them into repeat buyers. Which brings me to my next example…

Repeat Customers. Repeat revenue is a wonderful thing, and an easy one too. Rather than constantly marketing to new groups of consumers, you already have a loyal base that keeps coming back without you even having to ask. Simply supply your consumers with a good product with great service, and voilà! You’ve got yourself a constant customer.

Hobbyists. You wouldn’t believe how much money hobbyists pour into their precious pastimes. You can successfully target the hobbyist niche by connecting well with their interests, which in turn can translate into a profitable business.

Is There Enough Demand For Your Product?

Even a newbie knows that without demand, there’s no business. If nobody wants what you’re selling, you won’t be profitable. It’s as simple as that.

For this reason, you want to make sure the market demand for your product is healthy before you start investing time and money into it.

Luckily, there are a couple of awesome tools at your disposal that can help you figure this out.

Google Keyword Planner

You can easily find out how many people are searching for your product online by using the Google Keyword Planner tool for AdWords. You can set the parameters of how the search will be conducted.

For example, you can set it up so that the system brings up only searches that have low to medium competition and have at least 1,000 searches per month. You’ll be able to select a broad, phrase or exact match to the keyword you specify when this tool searches volumes. It’s typically recommended to use the exact match option, as you’ll be better able to get an idea of the search volume for that keyword.

A few other things you’ll want to do include:

  • Identifying the difference between local or global search volumes.
  • Identifying where you’ll be selling your product. If you’re selling primarily to US customers, a local search would be justified.
  • Identifying long-tail keyword variations. If you find a huge variety of these, it’s a good indication that your product is actively being searched for, which means the market is probably a strong one.

Google Trends

Another awesome tool supplied by none other the most popular search engine out there is Google Trends. This tool is great for looking at more detailed information about search trends. With it, you’ll be able to identify the search volume (which should ideally increase over time), what the most popular search terms are, where people who are searching for your product are located in the world, and if the demand for the product fluctuates at different times of the year.

Any product that you’re seriously considering selling should warrant some time understanding the complexities of your niche’s search volume. The Google Trends tool is great for helping you gain a better idea of your product’s profit potential to help you avoid making costly mistakes.

What’s the Competition Like?

It’s always a good idea to identify what the competition is like before you dive into an online business venture, but this can be a tricky thing to do. Too much competition could mean you’ll have a tough time building decent traffic, while too little competition could mean that the market is a small one that will limit your business’ ability to grow.

The best way to analyze your competition is to look at the sites in Google that are organically reaching top spots for a specific keyword. You’ll have to compete with these high-listers in order to land on page one.

This is where search engine optimization (SEO) comes into play. While you can of course pay for advertising, your dropshipping site will rely mostly on free traffic from the search engines.

Here are some things to look at when analyzing the competition:

Number of Linking Domains. Much of Google’s ranking algorithm relies on incoming links. The more quality links a site is receiving, the higher it will rank in Google. It’s helpful to identify how many inbound links your competitors’ websites are getting in order to give you an idea of what it will take to compete. Ideally, the links should be coming from unique domains. It’s more impressive to Google if your site is attracting new domains every day, as opposed to bringing in the same ones over and over again.

Authority of Competing Websites. Not only does Google look at how many backlinks a site is getting, it also looks at the authority of each site that it is linking to it. Google looks favorably on a website that is getting links from sites like The Washington Post as opposed to some ‘random’ site that’s only got a handful of pages and a PR of 0.

You can check a site’s Page Rank by using a browser extension like SearchStatus for Firefox. Essentially, anything with a PR of 5 and over is considered a high level of authority. If most of the sites ranking on the first page of Google have any of these numbers, your marketing efforts will have to be very strong.

Conclusion

So how can you be absolutely sure that the product or niche that you’ve picked for your dropshipping business will work?

Honestly, you really can’t be 100% certain of success. However, following the above tips can help put you in a much better position. Make sure you do your homework before you start investing your blood, sweat, and tears into your dropshipping business. And if one idea turns out to be a dud, move on to the next until you find one that looks promising.

Just don’t be on the lookout for that “perfect” scenario – if you do, you’ll be waiting forever.

Are you thinking about starting a dropshipping business? What are your biggest worries? Please share your thoughts below!

Posted on Leave a comment

Lessons learnt planning a big product release

We recently released version 1.6 of Sensei (our learning management plugin), which proved to be the biggest, most feature-rich release since the plugin was launched almost 18 months ago.

While, overall, I consider the release to be successful, I also learnt a lot during this release cycle and there are certain things I would have done differently in hindsight.

I’d like to share some of those insights with you here.

1. Less new features per release

Sensei 1.6 introduced around 10 new features.

On the surface, this seems like a big win for Sensei users, as each feature adds value to the plugin.

The payoff is in the time spent waiting for these features to be implemented.

Looking back, we could have released version 1.6 a month earlier, with half of the features, and then added the rest of the features to a 1.7 release.

The end result would have been the same, but half of the value would have been delivered much earlier.

In future, these feature releases will be limited to 3 or 4 new features, providing the same amount of value in smaller, more regular packages.

2. Hofstadter’s law

Hofstadter’s law states:

Things will always take longer than you expect, even when you take into account Hofstadter’s Law.

During the development cycle, I had been telling people that a certain feature was coming in version 1.6, and giving an estimate of when we planned to release it.

Inevitably, despite our best efforts, the target release date came and went, and I had to apologise for the delay and give revised estimates.

It’s always difficult to estimate the time requirements for development work, at least until you’ve spent some time working on it, to get an idea of the level of complexity.

Keeping the releases smaller, as mentioned in point 1, should help make these estimates easier, so we can endeavour to stick more closely to our target release dates.

3. You can’t do everything at once

Sensei is a popular product, and our ideas board is brimming with great feature requests.

It’s always tempting to try and squeeze as many of these ideas as possible into each release, so we can deliver instant happiness to everyone who uses (or wants to use) Sensei.

The reality, however, is that we can’t please everyone, and we can’t implement every feature at once. We have to prioritise, and as a result, some features have to wait, and others have to be rejected.

For example, we initially wanted to include support for the TinCan API in Sensei 1.6. As we progressed, we found that the implementation would be quite complex, and to avoid delaying the release further, we decided not to include it. Instead we plan to develop the functionality as an extension in the coming months.

Moving forward

I look forward to taking these insights and applying them to future Sensei releases, so we can bring you even more great features in a more timely manner.

Posted on Leave a comment

Make More Money through Ecommerce Analytics with Segment

It’s a simple idea – understanding how people use your store and catering to them will boost sales. What percentage of people abandon their carts? How many folks leave during the checkout process? What are the most popular products that we should feature on the homepage?

Analytics tools like Google Analytics and KISSmetrics can help you answer all of these questions, and optimize your site to close more sales.

When you’re ready to get more visitors, email and advertising tools like Bronto and Facebook Audiences can help you send personalized communications, drive traffic, and analyze the effectiveness of your campaigns.

The Easiest Way to Use Ecommerce Analytics

In the past, ecommerce companies needed to hire developers to install these tools individually. Though each tool is powered by the same information – who is on your site and what are they doing – they each require this information in slightly different formats. Developers used to need to write code to track this same information, in different languages, for each tool, on every page. Oy vey.

We’re eliminating this tedious process over here at Segment. We’ve built a single platform to collect all of your data and send it off to any tool you want to try with the flick of a switch.

We’ve just announced a new plugin for WooCommerce, too. This means Woo customers can install more than 100 analytics and marketing tools with zero code and zero developer costs.

Posted on 1 Comment

Birds In Flight And The Power Of A Remote Working Team

Do you remember the first time you took note of a flock of birds slipstreaming? And someone explained the way they fly aerodynamically and take turns to head up the V-shape and be carried along by the strength of their fellows? Nature is smart. We can learn a lot from it.

No one wants to end up in a job they dislike, but many do. No one wants to be an island either, as a little internal survey we did revealed. At WooThemes, we are determined to make sure everyone in our team is flourishing, growing and enjoying what they give themselves to each day. We recently asked what it was folks enjoyed most about working for Woo.

The Motivation Trifecta, plus one?

Drive proposes three elements that motivate and allow us to do our best work – autonomy, mastery and purpose. The most popular answers that came in from the Woo team fell neatly in step with these, with one key addition:

1. Freedom (autonomy)
2. Learning (mastery)
3. Making a difference (purpose)
4. Teamwork

At WooThemes I get to work with people who live and breathe what I do – so instead of being the guy in the back office who can do machines, I get to be the guy on the team who gets to try out his ideas and learn new things every. single. day. –Danny Santoro

The all important context is ‘team’

We all derive a level of satisfaction from having a sense of freedom, being productive and doing work that matters and it is not rocket science to equate autonomy, mastery, and purpose to overall workplace happiness. But we believe there is something more that leads to a happy working environment and at Woo, the Motivation Trifecta plays out in the all important context of our highly-functioning and carefully chosen team.

Getting to work with a team of like-minded, thoughtful individuals, all working together to achieve the same two goals. –Bryce Adams

I love working at WooThemes because I get to do what I love and I get to do it with awesome people who are all incredibly talented. –Hugh Lashbrooke

40 individuals, 14 countries, 1 team

WooThemes started with three people passionate about WordPress working in different corners of the world. Mark and Magnus met in the flesh for the first time over a year after starting a company together, and the level of trust, flexibility and ability to do great work oceans apart is part of our DNA.

The flexibility allowed while working on a distributed team that is spread out over 14 countries, with some of the most talented people in WordPress, on a team that enables me to make decisions that I believe will help better the company. –Maria Scarpello